Assignment 3
InDesign Project I - personal identity campaign - Develop three separate, but related components: letterhead, resume, business card. Each must include your name, address, phone number, and email address.
PURPOSE This project affords students with opportunities to: (1) consider how design conveys meaning; (2) select appropriate typefaces for use; (3) explore appropriate letter, word, and line spacing configurations; (4) arrange a series of consistent elements in different formats; and (5) produce materials that may be used in professional experiences.
1. Use two typefaces. You may use different weights, styles and sizes to create order and visual interest.
2. The only image you may use is the logo you created for Assignment 2. Make adjustments to logo in Illustrator.
3. Like the logo, the documents may include only 2 colors (not counting white, which is the color of the paper).
4. Letterhead and resume must both measure 8.5 x 11 inches (vertical format required). Business card must measure 3.5 x 2 inches (horizontal format required). Letterhead and resume must have margins of 1" or more (top, bottom, right, left). Permanent text elements like name, address, etc. may be placed within 1/4 inch. Do not use bleeds, as they require larger paper on these printers.
5. Business card must have text margins of 1/8 inch or greater, all four sides. No text should be set any closer to an edge. Type design elements (letters, initials, dingbats, bars, lines) are allowed to bleed off an edge, as long as cards can still be printed on 8.5 x 11 inch paper. Use Xacto knife to trim business card to specification.
6. Include your letter to me describing your process in creating this project on the letterhead page. Your letter should be about 200 words in length. Spellcheck your letter. Check grammar and punctuation. And sign your letter, after you print it.
7. Mount your letterhead, resume, and business card on a 20 x 15 inch sheet of black mounting board. Attach a precisely fitting, tracing paper overlay to the top of the board to protect your work.
8. Use the Export Command in InDesign to create a pdf of your files. Files should be in this format: royal_letter.pdf; royal_card.pdf. Save a copy of each in the Assignment 3 Files folder.
Mounting Instructions
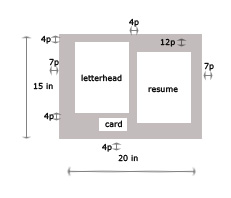
Mount your (blank) letterhead, resume and business card on a 20 x 15 inch sheet of black board (as shown). To attach items to the board, first position them without adhesive. [Note: “p” = “picas,” “pts” = “points,” “in” = “inches”; and 12 points = 1 pica, 6 picas = (about) 1 inch.] Your measurements may differ slightly from the example, depending how your board is cut. When components come together, leave 4 picas in between and make sure all other content is centered on board.
Draw light pencil marks at two corners of each item to indicate where you will mount it. Use StudioTac to mount the items in the proper places. Cut a piece of StudioTac slightly larger than the item. Remove the backing. Adhere the back of your document to the sticky side of the StudioTac and then rub (or burnish) to transfer adhesive. Then, gently position each item, print-side up, on the board. You can use an eraser or rubber cement remover to remove any excess adhesive.
Make at least 3 extra copies of each document in case you need to try again.
When you are satisfied with the layout, lay a clean piece of tracing paper over the front of the board and press or rub on the surface of the work. If there are any tears or stains, or bubbles you can't remove, replace the work as needed.
Create a tracing paper overlay to protect your work. Lay a clean piece of tracing paper 1 or 2 inches wider than the board on all sides. Center the board over the tracing paper, mounted side down. Fold the tracing paper over the top (2 inches) of the board and attach it, on back, with white tape all the way across. Trim excess on sides and leave 1inch on bottom so you can fold over and tape to protect.